Note: High resolution images of some of the following photos are available. These photos are marked with [HiRes] tags in their captions. Click on the photos to view their higher resolution images.
Photo editing is now almost always synonymous with professional photography. Like it or not, we have to accept the fact that most commercial photos have been digitally nursed to perfection before released to the general public. Smooth-skinned models, mobile phones with irresistibly glossy screens and burgers filled with incredibly golden patties are so commonly seen. Even the smelly yellow material used for the newspaper failed to degrade the quality of the photos.

Before: Trent Building.

[HiRes] After. One of my earlier attempts at more drastic photo editing -- I was trying to improve the dynamic range of my 5-year-old compact camera. And one of the edits that turned out not-that-much-better than the original.
I'm not a real supporter of digital photo editing, but it didn't take me long to realise how a quick tweak here and there can drastically enhance the attractiveness of photos.
The least controversial edit one can make is cropping. It 'cuts' out the sides of the picture, zooming it in and can be easily done even with the most basic software, like Microsoft Paint.

Before: children playing with the fountain at Old Market Square.

After: cropped to give more focus to the children and the water instead of the buildings behind.
While I do not have access to Adobe Photoshop, the holy grail in raster image editing, I do have GIMP installed in my computer. While it isn't nearly as powerful as Photoshop, it has the most important features bundled, and is legally free.
One such feature significant to me is the ability to adjust the picture's brightness/contrast. It does so in three ways -- the basic two-slider, input/output levels and a more advanced brightness curve. This is useful in helping to save so many of my shots with poor dynamic range.

Before: Jubilee Campus from Triumph Road Entrance. It was dark at night and I didn't have a tripod (I never had one).

After. Foreground slightly brightened, with the sky reduced to a more interesting shade of blue. If you look carefully you'll also notice that this picture is slightly rotated and cropped.
I can even select a certain part to brighten, leaving the others in relative darkness.

Before: Jubilee Campus. The subject of this photo, the banner, was rather dark. If the sun were stronger, I could have used the flash to brighten the banner up, but it wasn't and doing so would probably cause visible reflection on the banner.

[HiRes] After. The banner has been brightened, with the other parts untouched. This averts the eyes towards the banner, and along with the (albeit slight) bokeh has thrown the rest of the photo into the background.
Of course, not all of my photos here at my blog are edited. Some escaped relatively unscathed (editing is considered destructive) as they were already good enough.

Before: sunset at University Park lake.

[HiRes] After. Slightly oranged, nothing much.
A photo editor can also easily tune the colour balance of photos. This is useful when the camera's white balance setting is set wrongly when the photo is shot. For example, a scene filled with yellow incandescent light may look whitish on photos. Yellow tint can be added to restore the correct colour balance.

Before: Parliament House, Nottingham City Centre. This was shot in the afternoon.
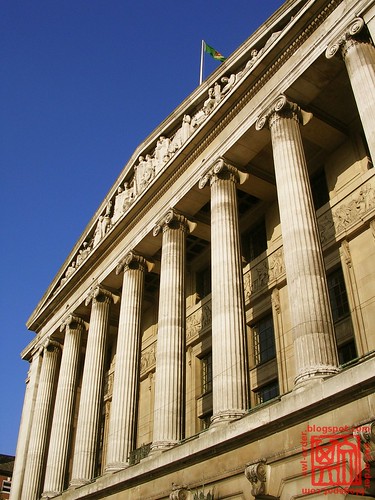
[HiRes] After. Yellow and red added, making the building look as if it were bathed in golden light.

Before: The Atrium, Jubilee Campus.
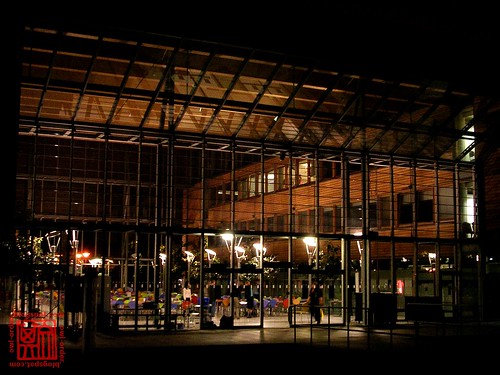
[HiRes] After. Brighter and more contrasty with more saturated colours. This edited photo actually has poorer dynamic range than the original, but throwing the grids into complete shadow over the internal lightings has created an interesting effect.

Before: a bench in the park. Taken in late September.

[HiRes] After. Red and yellow added, giving the entire picture a golden orange glow, all causing the scene look more autumn-like than ever.
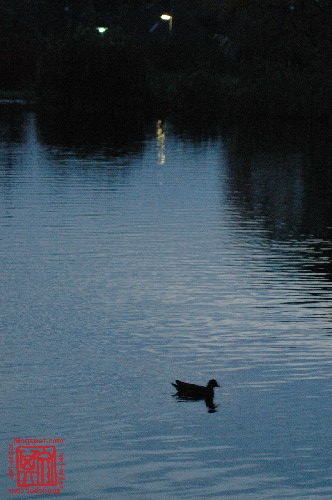
Before: duck paddling in the lake, evening. The blue of the water makes it look more like night, though.

[HiRes] After. Orange light to the rescue again.
But of course, photo editing leaves marks, especially from less-than-professional editors (like yours truly).

Before: a gate in the wall. I purposely overexposed this shot, hoping to capture as much detail in the shadow as possible.

After. Split the photo into three sections and applied different colour balance, brightness/contrast settings on them, making it one of my most heavily edited photos to date. Very satisfied with how the wall turned out to be. Took me almost an entire hour on this photo alone and it has editing marks yelling all over.

Zoomed comparison of edit scar. Notice how the brightness of the ground differs in front and behind the iron gate.

Before: Trent Building seen from University Boulevard entrance. It was in the evening, the sun was setting behind the Trent Building, throwing everything (except the sky) into the shadow. A challenging scene for cameras.

After. The sky was slightly darkened, making the colours more saturated. The foreground brightness was tuned up greatly, giving the photo more balance between the sky and the earth.

Zoomed edited photo. Imperfect selection during editing has caused some pixels' brightness to be tuned incorrectly. Some sky pixels are brighter instead of darker.
There are still tonnes a photo editing software can do. One common technique is vignetting, which darkens the edge of the photo to give more attention to the centre. I'd personally like to try HDR (high dynamic range) tone-mapping, which combines several photos of different exposures into a single shot, enhancing a photo's dynamic range significantly. Unfortunately, GIMP isn't able to handle HDR natively, and even if it does, I'll still need a camera with bracketing function and/or full manual mode (preferably an SLR) and a tripod, both of which I have access to only in my wildest daydreams.
Looks like honesty is still the best (and easiest) policy after all.


Wow, I never would have known the difference between ori and edited photos. Not that the original falls very short but editing really does enhance lots of stuff ...
ReplyDeleteJoanna:
ReplyDeleteyeah well, but i think i overdid some of the photos. i still prefer honest good photos out-of-the-camera. doesn't mean i'll stop editing though haha
Nice editing!
ReplyDeleteThanks for sharing.
Regards,
clipping path
Just getting started in photography, EditElf.com has give me a huge advantage over well established photographers. I don’t have to buy expensive editing software,learn all the tricks, and waste time on my computer. I started shooting weddings because I love photography and I love people, so that’s what I spend my time doing!
ReplyDeleteHi guys
ReplyDeleteVery nice blog.This blog is very use full for photo editing services.There are a lot of resources available in this blog.